Wednesday, August 8, 2018

DHIS2 Local Installation Guide for Microsoft Windows 10

DHIS2 Local Installation Guide for Microsoft Windows


DHIS2 runs on all platforms for which there exists a Java Runtime Environment version 8 or higher, which includes most popular operating systems such as Windows, Linux and Mac. DHIS2 runs on the PostgreSQL database system. DHIS2 is packaged as a standard Java Web Archive (WAR-file) and thus runs on any Servlet containers such as Tomcat and Jetty.

The DHIS2 team recommends Ubuntu 16.04 LTS operating system, PostgreSQL database system and Tomcat Servlet container as the preferred environment for server installations.

In this blog I am trying to guide guide you for setting up the above technology stack in Windows 10 Platform. It should however be read as a guide for getting up and running and not as an exhaustive documentation for the mentioned environment. We refer to the official Windows, PostgreSQL and Tomcat 8 documentation for in-depth reading.

Hardware requirement

DHIS2 is a database intensive application and requires that your server has an appropriate amount of RAM, number of CPU cores and a fast disk. These recommendations should be considered as rules-of-thumb and not exact measures. DHIS2 scales linearly on the amount of RAM and number of CPU cores so the more you can afford, the better the application will perform. 

For desktop installation with a blank database the following hardware requirement should be meet. To run Windows OS and services it nearly require 2GB of RAM. So computer should have at least 6 GB of and have at least 4 CPU cores; 6 core will be good.

Disk: Ideally use an SSD. Otherwise use a 7200 rpm disk. Minimum read speed is 150 Mb/s, 200 Mb/s is good, 350 Mb/s or better is ideal. In terms of disk space, at least 60 GB is reccomended, but will depend entirely on the amount of data which is contained in the data value tables. Analytics tables require a significant amount of disk space. Plan ahead and ensure that your server can be upgraded with more disk space as it becomes needed.

Software requirements

Later DHIS2.30 versions require the following software versions to operate.

Oracle Java JRE/JDK version 8 or later.
PostgreSQL database version 10 or later.
PostGIS database extension version 2.4 or later.
Tomcat servlet container version 8 or later.

Install all software as administrator.

Creating the configuration directory

Start by creating a suitable directory for the DHIS2 configuration files. This directory will also be used for apps, files and log files. An example directory could be: 'd:\dhis2\config'. Use the drive which have more space and preferably not on the Widows drive.

DHIS2 will look for an environment variable called DHIS2_HOME to locate the DHIS2 configuration directory. This directory will be referred to as DHIS2_HOME in this installation guide. 

Install Oracle Java 8 

Go to https://www.java.com/en/download/ and click on 'Free Java Download' agree the licence agreement and install Java 8 (JDK or JRE). JRE is sufficient.

Install Tomcat 8

Install Tomcat 8 “32-bit/64-bit Windows Service Installer”(it is VERY important that you install only the service installer - not the 32 bit or 64bit windows zip): https://tomcat.apache.org/download-80.cgi#8.5.32

***DO NOT start Tomcat at the end of installation***; if you did accidentally, then please stop the service.

Install PostgreSQL 10

Install PostgreSQL 10 from https://www.openscg.com/bigsql/postgresql/installers.jsp/

Note down and remember the postgres password you created and installation port (default 5432). Do no install on C: or windows drive, try to install on D:\ or the drive have good amount of space. 

Install Pgadmin 4 

Install PGADMIN4 form https://ftp.postgresql.org/pub/pgadmin/pgadmin4/v3.1/windows/pgadmin4-3.1-x86.exe. This a graphical database administration package.

Define the environment variable

My Computer (Right Click) → Properties → Advanced system settings → Environmental Variables


Under “System Variables” click “New” to add following:
Variable Name: DHIS2_HOME
      Value: D:\DHIS2\CONFIG
Variable Name: JAVA_OPTS
      Value: -Xms512m -Xmx2048m -XX:PermSize=256m -XX:MaxPermSize=768m
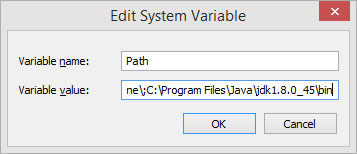
Make sure “Path” variable include the path to JDK’s “bin” folders address (i.e. C:\Program Files\Java\jdk1.8.0_45\bin)
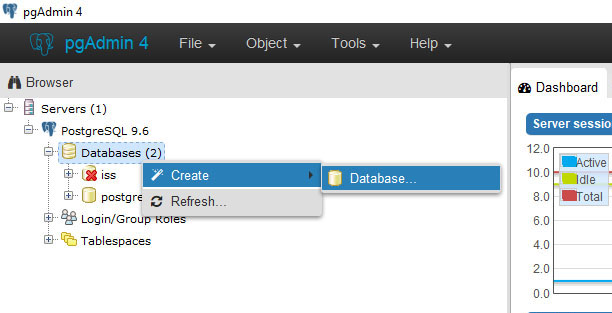


Create database

Open “PgAdmin 4” and connect with the password you gave during installation.
Right click databases and create a new database “dhis2” set Owner as “postgres”


Create DHIS2 Configuration file


DHIS using configuration file, is called, "dhis.conf" and resides in the DHIS2 home folder given in the environmental variables. We create a folder  'd:\dhis2\config' folder. Create a text "dhis.conf" in the above folder. Make sure the configuration files details reflect the details of the database created.

dhis.conf file content will be:

# Hibernate SQL dialect
connection.dialect = org.hibernate.dialect.PostgreSQLDialect
# JDBC driver class
connection.driver_class = org.postgresql.Driver
# Database connection URL
jdbc:postgresql://localhost:5432/dhis2_test
# Database username
connection.username = postgres
# Database password
connection.password = Postgres1#
# Database schema behavior, can be validate, update, create, create-drop
connection.schema = update
# Encryption password (sensitive)
encryption.password = xxxxxxxx

Note that encryption password should long and combination of multiple characters. Pleas kept it properly and if lost might not decrypt data of individual records.

Download DHIS2 war file 

Download the latest DHIS2 war file dhis.war (https://www.dhis2.org/downloads) and copy it in to “webapps” folder of the Tomcat installation (i.e. C:\Program Files\Apache Software Foundation\Tomcat 7.0\webapps).

Run Tomcat and DHIS2

Run Tomcat 8 service to deploy the war file. Once the deployment is complete access DHIS2 using the web browser: http://localhost:8080/dhis/.

    Username: admin
    Password: district


Tuesday, July 24, 2018

How to remove Postgres from any installation

How to remove Postgres from any  installation

If your install isn't already damaged, you can drop unwanted PostgreSQL servers ("clusters") in Ubuntu using 'pg_dropcluster'. Use that in preference to a full purge and reinstall if you just want to start with a freshly 'initdb' PostgreSQL instance.

If you really need to do a full purge and reinstall, first make sure PostgreSQL isn't running.

ps -C postgres 

should show no results.

Now run:

apt-get --purge remove postgresql\*

to remove everything PostgreSQL from your system. Just purging the postgres package isn't enough since it's just an empty meta-package.

Once all PostgreSQL packages have been removed, run:

rm -r /etc/postgresql/
rm -r /etc/postgresql-common/
rm -r /var/lib/postgresql/
userdel -r postgres
groupdel postgres

You should now be able to:

apt-get install postgresql

or for a complete install:

apt-get install postgresql-9.6 postgresql-contrib-9.6 postgresql-doc-9.6


Saturday, June 9, 2018

30 Useful Linux Commands for System Administrators

Originally written by Ravi Saive


1. Uptime Command

In Linux uptime command shows since how long your system is running and the number of users are currently logged in and also displays load average for 1,5 and 15 minutes intervals.

# uptime

08:16:26 up 22 min,  1 user,  load average: 0.00, 0.03, 0.22
Check Uptime Version

Uptime command don’t have other options other than uptime and version. It gives information only in hours:mins if it less than 1 day.

[tecmint@tecmint ~]$ uptime -V
procps version 3.2.8

2. W Command

It will displays users currently logged in and their process along-with shows load averages. also shows the login name, tty name, remote host, login time, idle time, JCPU, PCPU, command and processes.

# w

08:27:44 up 34 min,  1 user,  load average: 0.00, 0.00, 0.08
USER     TTY      FROM              LOGIN@   IDLE   JCPU   PCPU WHAT
tecmint  pts/0    192.168.50.1     07:59    0.00s  0.29s  0.09s w
Available options

-h : displays no header entries.
-s : without JCPU and PCPU.
-f : Removes from field.
-V : (upper letter) – Shows versions.

3. Users Command

Users command displays currently logged in users. This command don’t have other parameters other than help and version.

# users

hannan

4. Who Command

who command simply return user name, date, time and host information. who command is similar to w command. Unlike w command who doesn’t print what users are doing. Lets illustrate and see the different between who and w commands.

# who

tecmint  pts/0        2012-09-18 07:59 (192.168.50.1)
# w

08:43:58 up 50 min,  1 user,  load average: 0.64, 0.18, 0.06
USER     TTY      FROM              LOGIN@   IDLE   JCPU   PCPU WHAT
tecmint  pts/0    192.168.50.1     07:59    0.00s  0.43s  0.10s w
Who command Options

-b : Displays last system reboot date and time.
-r : Shows current runlet.
-a, –all : Displays all information in cumulatively.

5. Whoami Command

whoami command print the name of current user. You can also use “who am i” command to display the current user. If you are logged in as a root using sudo command “whoami” command return root as current user. Use “who am i” command if you want to know the exact user logged in.

# whoami

hannan

6. ls Command

ls command display list of files in human readable format.

# ls -l

total 114
dr-xr-xr-x.   2 root root  4096 Sep 18 08:46 bin
dr-xr-xr-x.   5 root root  1024 Sep  8 15:49 boot
Sort file as per last modified time.

# ls -ltr

total 40
-rw-r--r--. 1 root root  6546 Sep 17 18:42 install.log.syslog
-rw-r--r--. 1 root root 22435 Sep 17 18:45 install.log
-rw-------. 1 root root  1003 Sep 17 18:45 anaconda-ks.cfg
For more examples of ls command, please check out our article on 15 Basic ‘ls’ Command Examples in Linux.

7. Crontab Command

List schedule jobs for current user with crontab command and -l option.

# crontab -l

00 10 * * * /bin/ls >/ls.txt
Edit your crontab with -e option. In the below example will open schedule jobs in VI editor. Make a necessary changes and quit pressing :wq keys which saves the setting automatically.

# crontab -e
For more examples of Linux Cron Command, please read our earlier article on 11 Cron Scheduling Task Examples in Linux.

8. Less Command

less command allows quickly view file. You can page up and down. Press ‘q‘ to quit from less window.

# less install.log

Installing setup-2.8.14-10.el6.noarch
warning: setup-2.8.14-10.el6.noarch: Header V3 RSA/SHA256 Signature, key ID c105b9de: NOKEY
Installing filesystem-2.4.30-2.1.el6.i686
Installing ca-certificates-2010.63-3.el6.noarch
Installing xml-common-0.6.3-32.el6.noarch
Installing tzdata-2010l-1.el6.noarch
Installing iso-codes-3.16-2.el6.noarch

9. More Command

more command allows quickly view file and shows details in percentage. You can page up and down. Press ‘q‘ to quit out from more window.

# more install.log

Installing setup-2.8.14-10.el6.noarch
warning: setup-2.8.14-10.el6.noarch: Header V3 RSA/SHA256 Signature, key ID c105b9de: NOKEY
Installing filesystem-2.4.30-2.1.el6.i686
Installing ca-certificates-2010.63-3.el6.noarch
Installing xml-common-0.6.3-32.el6.noarch
Installing tzdata-2010l-1.el6.noarch
Installing iso-codes-3.16-2.el6.noarch
--More--(10%)

10. CP Command

Copy file from source to destination preserving same mode.

# cp -p fileA fileB
You will be prompted before overwrite to file.

# cp -i fileA fileB

11. MV Command

Rename fileA to fileB. -i options prompt before overwrite. Ask for confirmation if exist already.

# mv -i fileA fileB

12. Cat Command

cat command used to view multiple file at the same time.

# cat fileA fileB
You combine more and less command with cat command to view file contain if that doesn’t fit in single screen / page.

# cat install.log | less

# cat install.log | more
For more examples of Linux cat command read our article on 13 Basic Cat Command Examples in Linux.

13. Cd command (change directory)

with cd command (change directory) it will goes to fileA directory.

# cd /fileA

14. pwd command (print working directory)

pwd command return with present working directory.

# pwd

/root

15. Sort command

Sorting lines of text files in ascending order. with -r options will sort in descending order.

#sort fileA.txt

#sort -r fileA.txt

16. VI Command

Vi is a most popular text editor available most of the UNIX-like OS. Below examples open file in read only with -R option. Press ‘:q‘ to quit from vi window.

# vi -R /etc/shadows

17. SSH Command (Secure Shell)

SSH command is used to login into remote host. For example the below ssh command will connect to remote host (192.168.50.2) using user as narad.

# ssh narad@192.168.50.2
To check the version of ssh use option -V (uppercase) shows version of ssh.

# ssh -V

OpenSSH_5.3p1, OpenSSL 1.0.0-fips 29 Mar 2010

18. Ftp or sftp Command

ftp or sftp command is used to connect to remote ftp host. ftp is (file transfer protocol) and sftp is (secure file transfer protocol). For example the below commands will connect to ftp host (192.168.50.2).

# ftp 192.168.50.2

# sftp 192.168.50.2
Putting multiple files in remote host with mput similarly we can do mget to download multiple files from remote host.

# ftp > mput *.txt

# ftp > mget *.txt

19. Service Command

Service command call script located at /etc/init.d/ directory and execute the script. There are two ways to start the any service. For example we start the service called httpd with service command.

# service httpd start
OR
# /etc/init.d/httpd start

20. Free command

Free command shows free, total and swap memory information in bytes.

# free
             total       used       free     shared    buffers     cached
Mem:       1030800     735944     294856          0      51648     547696
-/+ buffers/cache:     136600     894200
Swap:      2064376          0    2064376
Free with -t options shows total memory used and available to use in bytes.

# free -t
             total       used       free     shared    buffers     cached
Mem:       1030800     736096     294704          0      51720     547704
-/+ buffers/cache:     136672     894128
Swap:      2064376          0    2064376
Total:     3095176     736096    2359080

21. Top Command

top command displays processor activity of your system and also displays tasks managed by kernel in real-time. It’ll show processor and memory are being used. Use top command with ‘u‘ option this will display specific User process details as shown below. Press ‘O‘ (uppercase letter) to sort as per desired by you. Press ‘q‘ to quit from top screen.

# top -u tecmint

top - 11:13:11 up  3:19,  2 users,  load average: 0.00, 0.00, 0.00
Tasks: 116 total,   1 running, 115 sleeping,   0 stopped,   0 zombie
Cpu(s):  0.0%us,  0.3%sy,  0.0%ni, 99.7%id,  0.0%wa,  0.0%hi,  0.0%si,  0.0%st
Mem:   1030800k total,   736188k used,   294612k free,    51760k buffers
Swap:  2064376k total,        0k used,  2064376k free,   547704k cached

PID USER      PR  NI  VIRT  RES  SHR S %CPU %MEM    TIME+  COMMAND
1889 tecmint   20   0 11468 1648  920 S  0.0  0.2   0:00.59 sshd
1890 tecmint   20   0  5124 1668 1416 S  0.0  0.2   0:00.44 bash
6698 tecmint   20   0 11600 1668  924 S  0.0  0.2   0:01.19 sshd
6699 tecmint   20   0  5124 1596 1352 S  0.0  0.2   0:00.11 bash
For more about top command we’ve already compiled a list of 12 TOP Command Examples in Linux.

22. Tar Command

tar command is used to compress files and folders in Linux. For example the below command will create a archive for /home directory with file name as archive-name.tar.

# tar -cvf archive-name.tar /home
To extract tar archive file use the option as follows.

# tar -xvf archive-name.tar

23. Grep Command

grep search for a given string in a file. Only tecmint user displays from /etc/passwd file. we can use -i option for ignoring case sensitive.

# grep tecmint /etc/passwd

tecmint:x:500:500::/home/tecmint:/bin/bash

24. Find Command

Find command used to search files, strings and directories. The below example of find command search tecmint word in ‘/‘ partition and return the output.

# find / -name tecmint

/var/spool/mail/tecmint
/home/tecmint
/root/home/tecmint
For complete guide on Linux find command examples fount at 35 Practical Examples of Linux Find Command.

25. lsof Command

lsof mean List of all open files. Below lsof command list of all opened files by user tecmint.

# lsof -u tecmint

COMMAND  PID    USER   FD   TYPE     DEVICE SIZE/OFF   NODE NAME
sshd    1889 tecmint  cwd    DIR      253,0     4096      2 /
sshd    1889 tecmint  txt    REG      253,0   532336 298069 /usr/sbin/sshd
sshd    1889 tecmint  DEL    REG      253,0          412940 /lib/libcom_err.so.2.1
sshd    1889 tecmint  DEL    REG      253,0          393156 /lib/ld-2.12.so
sshd    1889 tecmint  DEL    REG      253,0          298643 /usr/lib/libcrypto.so.1.0.0
sshd    1889 tecmint  DEL    REG      253,0          393173 /lib/libnsl-2.12.so
sshd    1889 tecmint  DEL    REG      253,0          412937 /lib/libkrb5support.so.0.1
sshd    1889 tecmint  DEL    REG      253,0          412961 /lib/libplc4.so
For more lsof command examples visit 10 lsof Command Examples in Linux.

26. last command

With last command we can watch user’s activity in the system. This command can execute normal user also. It will display complete user’s info like terminal, time, date, system reboot or boot and kernel version. Useful command to troubleshoot.

# last

tecmint  pts/1        192.168.50.1     Tue Sep 18 08:50   still logged in
tecmint  pts/0        192.168.50.1     Tue Sep 18 07:59   still logged in
reboot   system boot  2.6.32-279.el6.i Tue Sep 18 07:54 - 11:38  (03:43)
root     pts/1        192.168.50.1     Sun Sep 16 10:40 - down   (03:53)
root     pts/0        :0.0             Sun Sep 16 10:36 - 13:09  (02:32)
root     tty1         :0               Sun Sep 16 10:07 - down   (04:26)
reboot   system boot  2.6.32-279.el6.i Sun Sep 16 09:57 - 14:33  (04:35)
narad    pts/2        192.168.50.1     Thu Sep 13 08:07 - down   (01:15)
You can use last with username to know for specific user’s activity as shown below.

# last tecmint

tecmint  pts/1        192.168.50.1     Tue Sep 18 08:50   still logged in
tecmint  pts/0        192.168.50.1     Tue Sep 18 07:59   still logged in
tecmint  pts/1        192.168.50.1     Thu Sep 13 08:07 - down   (01:15)
tecmint  pts/4        192.168.50.1     Wed Sep 12 10:12 - 12:29  (02:17)

27. ps command

ps command displays about processes running in the system. Below example show init process only.

# ps -ef | grep init

root         1     0  0 07:53 ?        00:00:04 /sbin/init
root      7508  6825  0 11:48 pts/1    00:00:00 grep init

28. kill command

Use kill command to terminate process. First find process id with ps command as shown below and kill process with kill -9 command.

# ps -ef | grep init
root         1     0  0 07:53 ?        00:00:04 /sbin/init
root      7508  6825  0 11:48 pts/1    00:00:00 grep init

# kill- 9 7508

29. rm command

rm command used to remove or delete a file without prompting for confirmation.

# rm filename
Using -i option to get confirmation before removing it. Using options ‘-r‘ and ‘-f‘ will remove the file forcefully without confirmation.

# rm -i test.txt

rm: remove regular file `test.txt'?

30. mkdir command example.

mkdir command is used to create directories under Linux.

# mkdir directoryname
This is a handy day to day useable basic commands in Linux / Unix-like operating system. Kindly share through our comment box if we missed out.

Monday, June 4, 2018

Install PostgreSQL 10 on Ubuntu 16.04 LTS

Install PostgreSQL 10 on Ubuntu 16.04 LTS

I was facing issues to install PostgreSQL 10 on Ubuntu 16.04 LTS, so I documented it, so others can save time. Note that technical platform are very dynamic, might change over the period.

The PostgreSQL Global Development Group (PGDG) maintains an APT repository of PostgreSQL packages for Debian and Ubuntu located at http://apt.postgresql.org/pub/repos/apt/. Their aim to building PostgreSQL server packages as well as extensions and modules packages on several Debian/Ubuntu releases for all PostgreSQL versions supported.

I am using their repository to install PostgreSQL 10. Note that default apt repository fro Ubuntu 16.04 LTS is PostgreSQL 9.5.

Step 1:

Create /etc/apt/sources.list.d/pgdg.list. The distributions are called codename-pgdg. For Ubuntu 16.04 LTS the code name is xenial. Two way you can do that; first one will do for any version as it is determinig the code name of the operating system.

$ sudo sh -c 'echo "deb http://apt.postgresql.org/pub/repos/apt/ $(lsb_release -cs)-pgdg main" > /etc/apt/sources.list.d/pgdg.list'

or for Ubuntu 16.04 LTS

$ sudo sh -c 'echo "deb http://apt.postgresql.org/pub/repos/apt/xenial-pgdg main" > /etc/apt/sources.list.d/pgdg.list'

or you can manually add by:

$ sudo nano /etc/apt/sources.list.d/pgdg.list

Add

deb http://apt.postgresql.org/pub/repos/apt/ xenial-pgdg main

Press Ctrl X, Y to save and close.

Step 2:

Import the repository key from https://www.postgresql.org/media/keys/ACCC4CF8.asc, update the package lists, and start installing packages:

$ sudo apt-get install wget ca-certificates

$ wget --quiet -O - https://www.postgresql.org/media/keys/ACCC4CF8.asc | sudo apt-key add -

$ sudo apt-get update

$ sudo apt-get upgrade

$ sudo apt-get install postgresql-10

Step 3

Connect to postgres and create password for 'postgres' user.

$ sudo su - postgres

$ psql

\password postgres

enter your desired password twice. exit from psql.

# \q

All done.