Install WordPress On Ubuntu 18.04 LTS With Nginx, MySQL and PHP
For those who want to learn how to install WordPress on Ubuntu 18.04 LTS, this document is for them. WordPress is an open source software that anyone can use to create powerful and dynamic websites based on PHP. Many large and popular websites online run WordPress.This tutorial will show how to install WordPress on Ubuntu 18.04 LTS with Nginx, MySQL and PHP-FPM support.
STEP 1: Prepare and Update UBUNTU
Always update Ubuntu servers before installing packages. To update Ubuntu, run the commands below.$ sudo apt-get update
$ sudo apt-get upgrade
$ sudo apt autoremove
After updating Ubuntu, we will install required packages for WordPress to work.
Step 2: Install the Nginx Web Server
In order to display web pages to our site visitors, we are going to employ Nginx, a modern, efficient web server.All of the software we will be using for this procedure will come directly from Ubuntu's default package repositories. This means we can use the apt package management suite to complete the installation.
$ sudo apt-get install nginx
On Ubuntu 18.04 LTS, Nginx is configured to start running upon installation.
If you have the ufw firewall running, as outlined in our initial setup guide, you will need to allow connections to Nginx. Nginx registers itself with ufw upon installation, so the procedure is rather straight forward.
It is recommended that you enable the most restrictive profile that will still allow the traffic you want. Since we haven't configured SSL for our server yet, in this guide, we will only need to allow traffic on port 80.
You can enable this by typing:
$ sudo ufw allow 'Nginx HTTP'
You can verify the change by typing:
$ sudo ufw status
You should see HTTP traffic allowed in the displayed output:
Status: active
To Action From
-- ------ ----
OpenSSH ALLOW Anywhere
Nginx HTTP ALLOW Anywhere
OpenSSH (v6) ALLOW Anywhere (v6)
Nginx HTTP (v6) ALLOW Anywhere (v6)
With the new firewall rule added, you can test if the server is up and running by accessing your server's domain name or public IP address in your web browser.
If you do not have a domain name pointed at your server and you do not know your server's public IP address, you can find it by typing one of the following into your terminal:
$ ip addr show eth0 | grep inet | awk '{ print $2; }' | sed 's/\/.*$//'
This will print out a few IP addresses. You can try each of them in turn in your web browser.
As an alternative, you can check which IP address is accessible as viewed from other locations on the internet:
$ curl -4 icanhazip.com
Type one of the addresses that you receive in your web browser. It should take you to Nginx's default landing page:
http://server_domain_or_IP
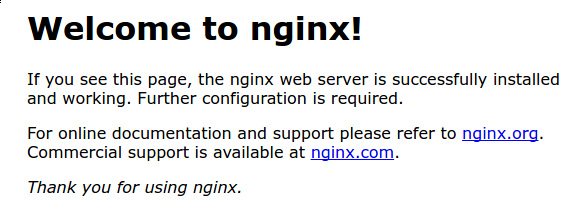
If you see the above page, you have successfully installed Nginx.
Step 3: Install MySQL to Manage Site Data
Now that we have a web server, we need to install MySQL, a database management system, to store and manage the data for our site.You can install this easily by typing:
$ sudo apt-get install mysql-server
You will be asked to supply a root (administrative) password for use within the MySQL system.
The MySQL database software is now installed, but its configuration is not exactly complete yet.
To secure the installation, we can run a simple security script that will ask whether we want to modify some insecure defaults. Begin the script by typing:
$ mysql_secure_installation
You will be asked to enter the password you set for the MySQL root account as follows. When prompted, answer the questions below by following the guide.
- Enter current password for root (enter for none): Just press Enter
- Set root password? [Y/n]: Y
- New password: Enter password
- Re-enter new password: Repeat password
- Remove anonymous users? [Y/n]: Y
- Disallow root login remotely? [Y/n]: Y
- Remove test database and access to it? [Y/n]: Y
- Reload privilege tables now? [Y/n]: Y
Step 4: Install PHP for Processing
We now have Nginx installed to serve our pages and MySQL installed to store and manage our data. However, we still don't have anything that can generate dynamic content. We can use PHP for this.Since Nginx does not contain native PHP processing like some other web servers, we will need to install php-fpm, which stands for "fastCGI process manager". We will tell Nginx to pass PHP requests to this software for processing.
We can install this module and will also grab an additional helper package that will allow PHP to communicate with our database backend. The installation will pull in the necessary PHP core files. Do this by typing:
$ sudo apt install php-fpm php-common php-mbstring php-xmlrpc php-soap php-gd php-xml php-intl php-mysql php-cli php-ldap php-zip php-curl
Configure the PHP Processor
We now have our PHP components installed, but we need to make a slight configuration change to make our setup more secure.Open the main php-fpm configuration file with root privileges:
$ sudo nano /etc/php/7.2/fpm/php.ini
What we are looking for in this file is the parameter that sets cgi.fix_pathinfo. This will be commented out with a semi-colon (;) and set to "1" by default.
This is an extremely insecure setting because it tells PHP to attempt to execute the closest file it can find if the requested PHP file cannot be found. This basically would allow users to craft PHP requests in a way that would allow them to execute scripts that they shouldn't be allowed to execute.
We will change both of these conditions by uncommenting the line and setting it to "0" like this:
cgi.fix_pathinfo=0
Then scroll down the lines in the file and change the following lines below and save.
post_max_size = 100M
memory_limit = 256M
max_execution_time = 360
upload_max_filesize = 100M
date.timezone = Asia/Dhaka
Save and close the file when you are finished.
Now, we just need to restart our PHP processor by typing:
$ sudo systemctl restart php7.2-fpm
This will implement the change that we made.
Step 5: Create a blank Wordpress Database
At this point, all the required WordPress packages and and servers are installed. The new server is now ready to host WordPress… On the new server, create a blank WordPress database. WordPress will use this empty database to store its content.Run the commands below to logon to the database server. When prompted for a password, type the root password you created above.
$ sudo mysql -u root -p
Then create a blank database called WP_database you can use the same database name from the old server.
CREATE DATABASE WP_database;
Create a database user called wp_user with new password. You can use the same username and password from the old server.
CREATE USER 'wp_user'@'localhost' IDENTIFIED BY 'type_password_here';
Then grant the user full access to the database.
GRANT ALL ON WP_database.* TO 'wp_user'@'localhost' IDENTIFIED BY 'type_user_password_here' WITH GRANT OPTION;
Finally, save your changes and exit.
FLUSH PRIVILEGES;
EXIT;
Step 6: Download WORDPRESS latest release
Next, visit WordPress site and download the latest…. or run the commands below to do that for you.$ cd /tmp && wget https://wordpress.org/latest.tar.gz
$ tar -zxvf latest.tar.gz
$ sudo mv wordpress /var/www/html/wordpress
Then run the commands below to set the correct permissions for WordPress root directory.
$ sudo chown -R www-data:www-data /var/www/html/wordpress/
$ sudo chmod -R 755 /var/www/html/wordpress/
Step 7: Configure WORDPRESS
Next, run the commands below to create WordPress wp-config.php file. This is the default configuration file for WordPress.$ sudo mv /var/www/html/wordpress/wp-config-sample.php /var/www/html/wordpress/wp-config.php
Then run the commands below to open WordPress configuration file.
$ sudo nano /var/www/html/wordpress/wp-config.php
Enter the highlighted text below that you created for your database and save.
// ** MySQL settings - You can get this info from your web host ** //
/** The name of the database for WordPress */
define('DB_NAME', 'WP_database');
/** MySQL database username */
define('DB_USER', 'wp_user');
/** MySQL database password */
define('DB_PASSWORD', 'new_password_here');
/** MySQL hostname */
define('DB_HOST', 'localhost');
/** Database Charset to use in creating database tables. */
define('DB_CHARSET', 'utf8');
/** The Database Collate type. Don't change this if in doubt. */
define('DB_COLLATE', '');
Save the file and you’re done.
Step 8: Configure the new WORDPRESS Site
Next, configure the WordPress site configuration file on the server. Run the commands below to create a new configuration file called wordpress$ sudo nano /etc/nginx/sites-available/wordpress
Then copy and paste the content below into the file and save it. Replace example.com with your own domain name.
server {
listen 80;
listen [::]:80;
root /var/www/html/wordpress;
index index.php index.html index.htm;
server_name example.com www.example.com;
client_max_body_size 100M;
location / {
try_files $uri $uri/ /index.php?$args;
}
location ~ \.php$ {
include snippets/fastcgi-php.conf;
fastcgi_pass unix:/var/run/php/php7.2-fpm.sock;
fastcgi_param SCRIPT_FILENAME $document_root$fastcgi_script_name;
}
}
Save the file and exit.
Step 9: Enable the WORDPRESS site
After configuring the VirtualHost above, enable it by running the commands below$ sudo ln -s /etc/nginx/sites-available/wordpress /etc/nginx/sites-enabled/
Now all is configured… run the commands below to reload Nginx web server and PHP-FPM settings.
$ sudo systemctl restart nginx.service
$ sudo systemctl restart php7.2-fpm.service
After restarting Nginx, open your browser and browse to the server IP address or hostname. If everything was setup correctly, you should see WordPress default configuration wizard.
http://example.com

Follow the on-screen instructions until you’re successfully configured WordPress. When you’re done, login to the admin dashboard and configure WordPress settings.
Congratulations! You’ve just successfully installed WordPress.